
|
|
How to join rounds
Most often, I use this method to join the rounds of a hat because I think
it makes a neater join. You don't get gaps because it "crowds" the joining stitches together.
However, it does create a diagonal line that looks like a seam: this is due to the fact that stitches veer a bit to the right as you work in the round. The diagonal line is more pronounced when you work a lot of rounds and/or use solid, smooth yarns. (Good to know: If you want to use the "wrong" side -- the more bumpy side -- of your work as its right side, the diagonal seam disappears and this join is virtually invisible.)
Treble stitch is illustrated, but this method also works well with double crochet.
Here are the specifics, from top left:
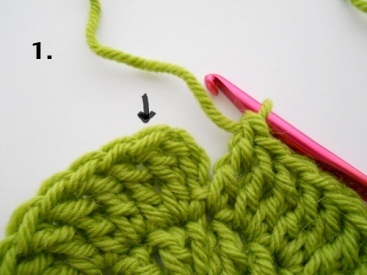
Step 1. Ignoring the beginning chain, join in the first stitch of the round, as shown by arrow.
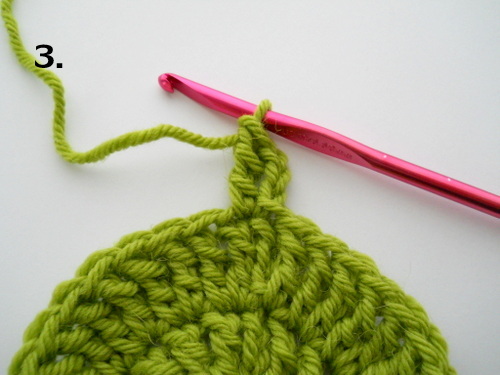
Step 2. After you slip stitch in the designated stitch, chain up* to begin the next round.
( * I chain 2 for double crochet and 3 for treble stitch. This makes a short-ish chain that lies neatly to the side of the join.)
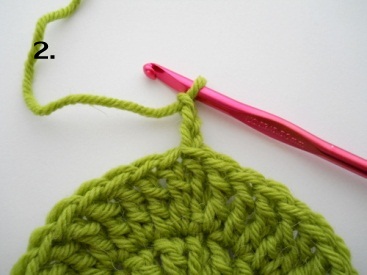
Step 3. In the new round, work your first stitch into the first stitch of the previous round. It's the one in which you made the slip-stitch join, and it's right next to the beginning chain.
And that's it!
NOTE: My earliest patterns have you work the increases in the slip stitch, as in Step 4, below -- I think it's the most invisible way to go. But, in 2016, I updated my patterns so that increases are in actual stitches -- just to make things simpler. So in the new and updated patterns, only Steps 1-3 are followed.
However, here's Step 4 if you're following an early pattern:
Step 4. (During increase rounds ONLY) For the final stitch in the round (when directed by the pattern), work a stitch in the slip stitch. Its place is shown by the arrow, and it's right next to the beginning chain on the other side. When you're not increasing, you follow just the first three joining steps.
it makes a neater join. You don't get gaps because it "crowds" the joining stitches together.
However, it does create a diagonal line that looks like a seam: this is due to the fact that stitches veer a bit to the right as you work in the round. The diagonal line is more pronounced when you work a lot of rounds and/or use solid, smooth yarns. (Good to know: If you want to use the "wrong" side -- the more bumpy side -- of your work as its right side, the diagonal seam disappears and this join is virtually invisible.)
Treble stitch is illustrated, but this method also works well with double crochet.
Here are the specifics, from top left:
Step 1. Ignoring the beginning chain, join in the first stitch of the round, as shown by arrow.
Step 2. After you slip stitch in the designated stitch, chain up* to begin the next round.
( * I chain 2 for double crochet and 3 for treble stitch. This makes a short-ish chain that lies neatly to the side of the join.)
Step 3. In the new round, work your first stitch into the first stitch of the previous round. It's the one in which you made the slip-stitch join, and it's right next to the beginning chain.
And that's it!
NOTE: My earliest patterns have you work the increases in the slip stitch, as in Step 4, below -- I think it's the most invisible way to go. But, in 2016, I updated my patterns so that increases are in actual stitches -- just to make things simpler. So in the new and updated patterns, only Steps 1-3 are followed.
However, here's Step 4 if you're following an early pattern:
Step 4. (During increase rounds ONLY) For the final stitch in the round (when directed by the pattern), work a stitch in the slip stitch. Its place is shown by the arrow, and it's right next to the beginning chain on the other side. When you're not increasing, you follow just the first three joining steps.